In this article, we will look at the topic of user story mapping together. User story mapping is a splitting strategy with which a user story or a larger requirement can be broken down into individual steps and visualized.
The advantages of user story mapping at a glance:
- Clarity: You see the overall picture and the steps at the same time.
- Communication: The team has a shared view of the project.
- Prioritization: You can tackle the most valuable aspects first.
- Adaptability: Changes can be easily integrated.
- Dependencies: It becomes clear which user stories are interdependent.
As a practical example, we consider the Ordering process of a food delivery service platform.
I explain why splitting user stories makes sense in this article.
The user story splitting strategies also work for larger work packages. Whether epics, features or in a classic environment only plays a subordinate role.
If you are familiar with user story mapping, you can get a better handle on the complexity of the requirements and achieve optimal work results. So grab your favorite hot beverage, take 10 minutes and let's get started!
Overview
- What is user story mapping?
- How do you read a user story map?
- How do I create a user story map?
- Can a user story map change?
- Example: Ordering process of a food delivery service platform
- Small exercise - Create your own user story map
- Conclusion
What is user story mapping?
User story mapping is the activity that results in a user story map. As with user stories, the focus here is also on the person who wants to use the new functionality. This is usually the user or customer.
In user story mapping, we visualize the user stories and their interrelationships. We put the individual user stories in a logical order and can prioritize them at the same time. The user story map serves as a compass, so to speak, so that everyone involved in the development stays on the right track. The team members can use the user story mapping to understand what the customer expects from the product, how they want to interact with it or use it.
There are different types of user story maps, which are arranged in different ways. For example, product visions and goals, necessary measures, derived tasks and user stories can be visualized. Or we can present epics, features, user stories and tasks in an overview.
How do you read a user story map?
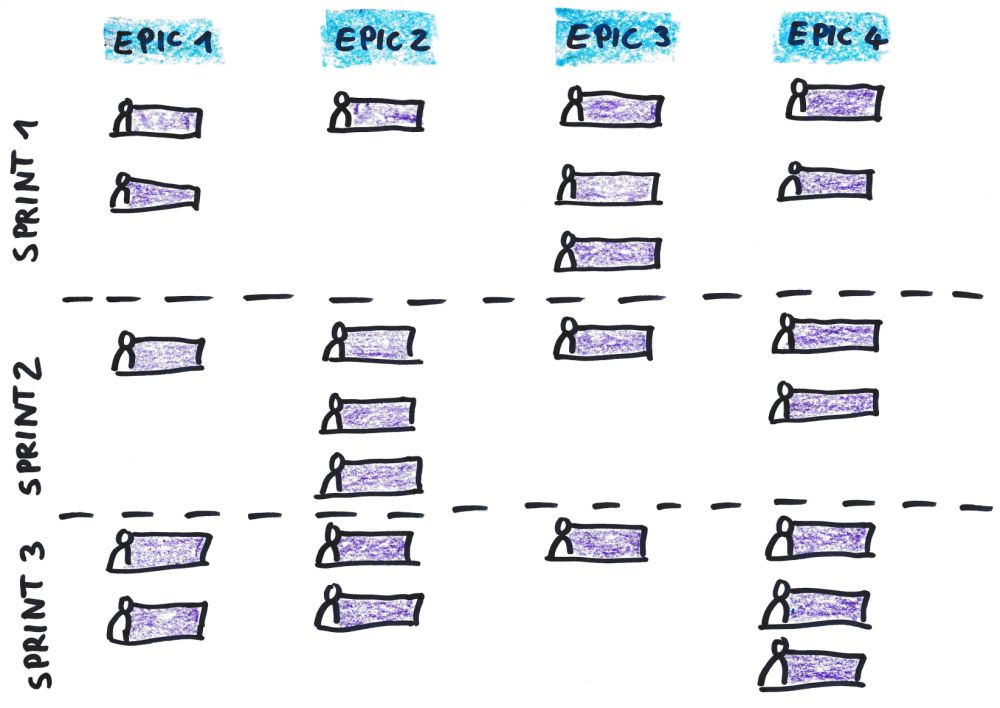
In contrast to a flat product backlog, a user story map offers a two-dimensional map.
Horizontal
- In the top line, we see the high-level requirements (epics, features or themes).
- We read from left to right and thus obtain the logical sequence of the high-level requirements.
- In other words, the user first uses Epic 1, then Epic 2, and so on. This sequence is referred to as the backbone.
- If necessary, it may be helpful to introduce a further grouping of high-level requirements above the first line.
Vertical
- The prioritization of the individual user stories within each column or an epic, feature or theme can also be seen. The higher up a user story is, the more important it is.
- You can also assign the user stories directly to individual sprints (also vertically).
How do I create a user story map?
1. determine your users
First, define who your users are. What are their goals?
2. determine the problem
Think about the problem you want to solve for your users. Define the scope so that the problem or your solution doesn't become too overwhelming. How does solving this problem add value to the product?
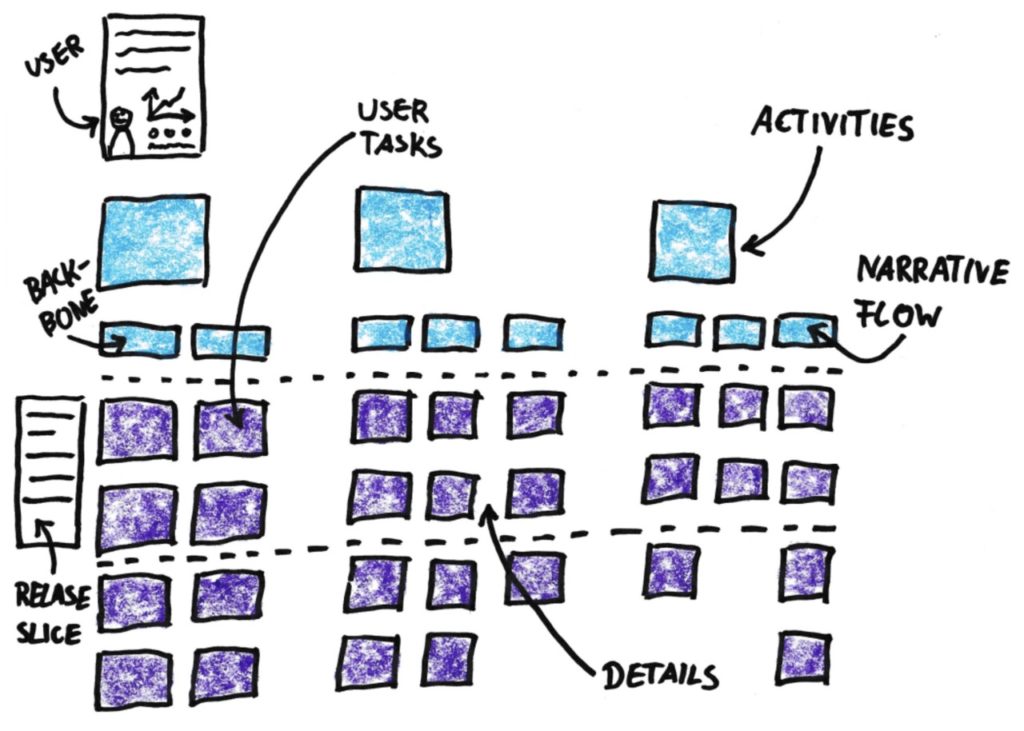
3. visualize the backbone
Define the common thread and the individual activities in your user's workflow. These activities should be wide-ranging, as we want to refine them in the next step.
4. create user stories
Define user stories that describe how users will use your future system or feature. All user stories together form the customer journey. Assign the user stories to the individual steps in the backbone.
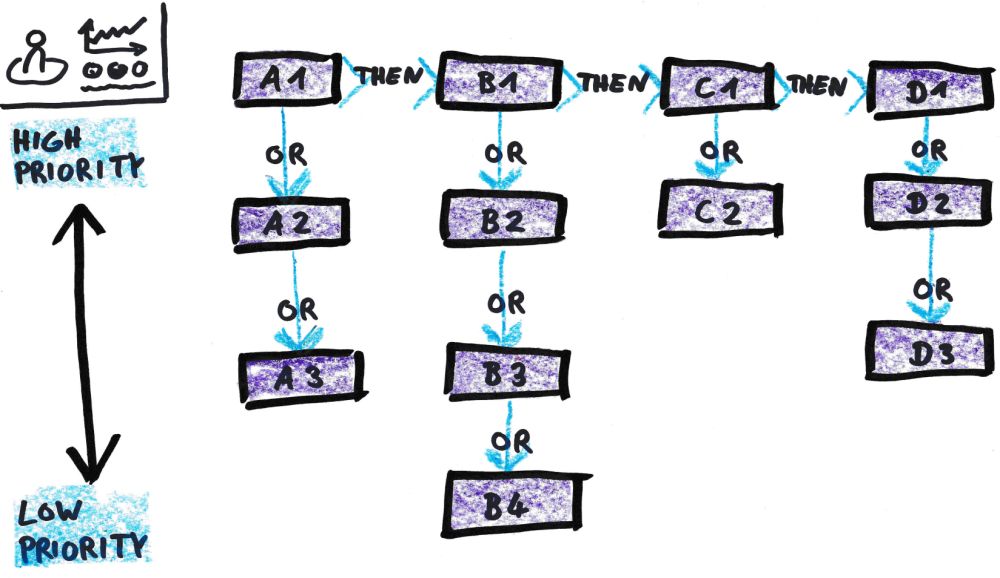
5. prioritize the user stories
Organize the user stories vertically from the most important to the least important. This helps the team to understand which stories have the greatest impact on the customer journey.
6. identify dependencies and obstacles
When creating the user story map, the team may identify areas with missing information, bottlenecks, gaps or necessary preliminary work. Include these findings in your user story map. For example, you can create technical stories or spikes to find alternatives or eliminate ambiguities.
7. plan your sprint
With the help of planning techniques such as Planning Poker, you can estimate the effort required for the user stories. The historical velocity of your team can tell you how many story points your team will achieve in a sprint. Now you can assign the user stories to the various sprints.
Can a user story map change?
Like a product backlog, a user story map is a living artifact. This means that the assumptions made at the beginning must be regularly reviewed.
User goals can change, as can the prioritization of user stories or the technical possibilities of the architecture used.
Traditionally, user story maps were created with sticky notes on walls or whiteboards. Sticky notes are easy to move around and a user story map on the wall in the office is visible to everyone.
However, there are also a few serious disadvantages:
- The sticky notes no longer adhere so well over time and fall off.
- Whiteboards are cleaned and the work is lost
- User story maps created at a single physical location are often not available to teams at other locations.
From my experience, I can only warmly recommend online collaboration boards. In my opinion, the best board at the moment is miro. This means that a globally distributed team can access the current status at any time and changes can be made very easily.
Example: Ordering process of a food delivery service platform
Let's illustrate this with an example. Let's imagine a food delivery platform like Just Eat or Uber Eats.
Let's assume we receive the following request in the form of a user story:
"As an end customer, I would like to place and pay for a food order to get my food delivered as quickly as possible.".
What sounds simple at first glance is, on closer inspection, too complex to be implemented in a single user story.
So we break down this requirement into a user story map and proceed as described above.
1. determine your users
Our user is the end customer who is hungry at home or at work. He wants to get a delicious meal on the table as quickly as possible to satisfy his hunger.
2. determine the problem
Our end customer wants to satisfy his emerging hunger. He doesn't want to cook himself or change his current location (i.e. leave the house).
3. visualize the backbone
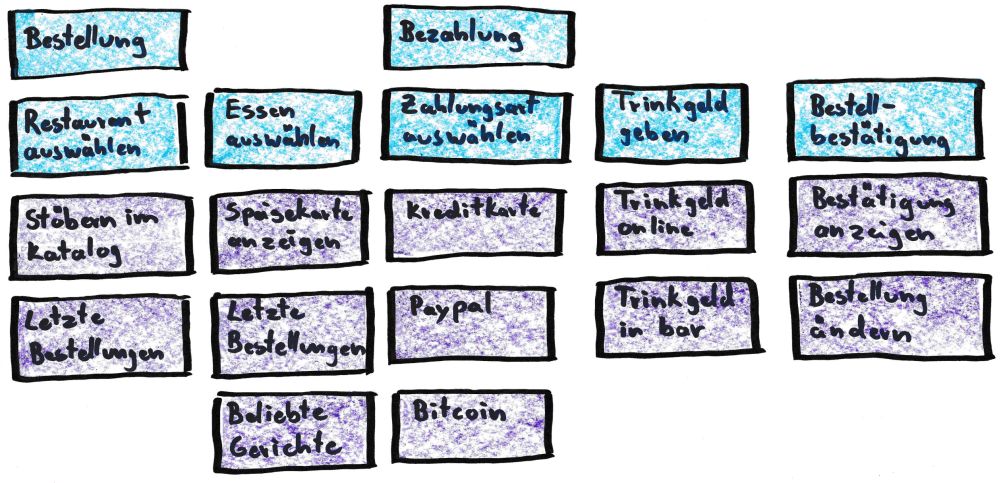
Roughly speaking, the end customer will go through the following activities with our app.
order
The end customer chooses a restaurant and selects one or more dishes from the menu.
Payment
The end customer selects a payment method. They can decide whether they would like to tip the delivery staff. Finally, they can view an order confirmation.
4. create user stories
We now consider in detail which options we offer the end customer in the individual activities. From this, we create our user stories and organize them according to their affiliation to the higher-level activity.
5. prioritize the user stories
We organize the user stories we create vertically from the most important to the least important. In doing so, we consider which user stories have the greatest influence on the customer journey.
6. identify dependencies and obstacles
We look at our user story map as a team. We identify possible gaps and dependencies between the user stories. Do we have to do certain preparatory work or fulfill certain conditions in order to implement a user story? We enter our new findings into the user story map.
7. plan your sprint
We now have an overview and can estimate the effort for the user stories with the help of Planning Poker in the team. Depending on priorities, capacities in the team and dependencies, we plan our next sprint. Note that we always have a functioning system to get feedback as early as possible.
I have outlined an example of this requirement above. Of course, this is just a start and you could extend the user story map with a few more user stories, e.g. introduce favorites, display estimated delivery time, introduce advanced search, send order confirmation by e-mail, etc.
Small exercise - Create your own user story map
If you like, you can now try to create a user story map yourself. Do you spontaneously lack a concrete scenario to practise? No problem! Just imagine the following situation.
Morning routine
It is a weekday. You have to go to work in your office (no home office). Visualize the process from the moment your alarm clock rings to the moment you step out of your front door, fresh and alert, and make your way to the office.
Exercise part 1
You know your user, their destination and their problem. Now think about which rooms you will enter in your home before you set off. Now we have the basic framework. What do you do in which room every morning? Do you set the alarm clock, feed the cat, brush your teeth, wake the children, do morning yoga?
Prioritize your activities - what is most important in each room, what is least important? Are there any dependencies?
Exercise part 2
In the first part, you created a user story map and prioritized the user stories. Now it's time for the second round.
Shock! You overslept because your alarm didn't go off. Nevertheless, you have to get to the office at this time for an important appointment. Unfortunately, you only have 1/3 of the time you normally need for your morning routine. Which activities are most important to you? Which ones do you skip? Mark the user stories that you will definitely do.
Ready? Congratulations! You have just defined the scope for an MVP. You've opted for the bare essentials and can still achieve your goal - your office - on time. That's a working product! Even if you haven't meditated, watered the plants, played with the dog or had breakfast.
Conclusion
User story mapping is an effective strategy for breaking down large requirements into small steps. The requirements are visualized and an overall picture is obtained, which promotes a common understanding within the team. The individual user stories are already roughly prioritized in order to focus on the aspects that bring the greatest added value. Dependencies can be derived from a user story map. Changes can be easily integrated.
I hope that you are now a little more familiar with the topic of user story mapping and that you can use this technique in your daily work.
Are you interested in other topics that will help you write better user stories? Download our "User story hacks" with the ultimate tips & tricks for agile user stories.
